
Great augmented reality (AR) content ideas, sadly, don’t always translate to great content. Creating practical, value-driven AR content takes careful planning, and smart choices about platforms, development tools, and the overall approach.
But don’t worry, we’re here to help you figure it all out. In this ArborXR guide, we’ll walk you through the key steps to creating AR content that actually delivers results for your business.
What Is Augmented Reality Content?
Augmented reality (AR) content consists of digital elements like images, 3D models, or animations superimposed onto the real world through devices such as smartphones, tablets, or AR headsets.
AR has found applications across various industries and use cases, including:
…and more.
Outsourced vs. In-House AR Content Development
Outsourced AR development involves hiring external professionals or agencies to create your AR content. In-house development means creating AR content with your own team and resources. It’s a big decision with a lot of nuance, but generally, we recommend outsourcing.
Here’s why:
- Industry expertise: Professionals have a deep understanding of the latest AR tools, platforms, trends, and experience to ensure your content is top-quality.
- Hands-on support: Some developers go beyond just content creation. They provide the expertise your entire project needs to deliver great results.
- Time and cost efficiency: Outsourcing to specialists saves you both time and money compared to building an in-house team from scratch.
If you're in need of expert, enterprise-ready AR developers, check out our XR directory to find vetted options. However, if you have the necessary coding and game development skills and are ready to take on the challenge yourself, these are the steps you’ll need to follow.
How to Create Augmented Reality Content in 5 Steps
1. Decide on Your Use Case
They say if you aim at nothing, you’ll hit it every time. In our experience working on more than 3,000 XR implementations, that couldn’t be more true when it comes to creating AR content. Before diving in, it’s crucial to set a clear purpose.
Ask yourself—what is this AR content for? Training, remote assistance, marketing, or education? Your answer will shape every aspect of your project, from design to features and user experience.
Your use case also determines the type of AR experience you'll create. Consider these four main types:
- Marker-based AR: Triggered by scanning a physical marker (e.g., QR code or image). Ideal for marketing materials, museum exhibits, and interactive brochures.
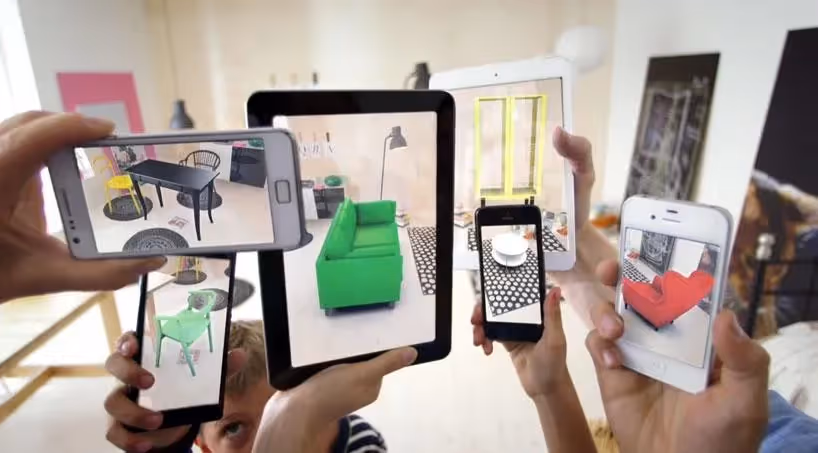
- Markerless AR: Uses the camera to detect the environment and place virtual objects without physical markers. Common in apps like IKEA Place for visualizing furniture.
- Location-based AR: Overlays digital content in specific real-world locations using GPS data. Used in apps like Pokémon GO and AR-guided tours.
- Projection-based AR: Projects digital imagery onto physical surfaces for real-time interaction. Particularly useful for interactive training.
2. Choose the Right AR Development Solutions
After defining your goals, select the platform for your AR content:
- Mobile devices (iOS/Android)
- AR headsets
- WebAR
- Cross-platform experience
Your platform choice determines the development tools needed for your AR project. Here's a quick overview of popular AR development tools and their supported platforms:
When selecting a development solution, ensure it offers the features your AR app requires. Consider needs such as:
- Advanced environmental understanding
- Marker-based or markerless experience
- Real-time object tracking
- Multi-user collaboration
Choose a platform that can deliver these features effectively.
4. Build Your 3D Models and Content
The heart of any AR experience is the 3D content that gets overlaid on the real world. Whether it’s a character, furniture, or an interactive object, your 3D models need to be well-designed and optimized for performance.
There are a couple of routes you can take:
- Modeling software: To create your models, you’ll use tools like Blender, Autodesk Maya, or Cinema 4D. These programs offer powerful features for designing detailed models that you can later import into your AR platform.
- Pre-made models: If you’d rather not start from scratch, you can pull from libraries like Adobe Stock or Clara, which offer pre-made 3D models.
Once your models are ready, bring them into your AR project using your development platform. You can also add interactivity, like letting users rotate or scale objects, or trigger animations when certain actions are taken (e.g., tapping an object).
Each development solution handles this differently. For instance, in Unity, you’d use C#, while ARKit uses Swift or Objective-C to script these interactions.
5. Test and Deploy
After creating your AR content, rigorous testing is crucial to identify bugs, errors, or limitations before launch. While testing typically involves multiple stages (alpha, beta, pilot, stress tests), focus on two key areas throughout the process:
- Device testing: Test your content on various devices to ensure smooth performance across platforms. Different devices have varying camera quality and processing power, which can affect performance.
- Real-world environments: AR behaves differently in various conditions, such as bright sunlight or dimly lit rooms. Testing in these environments allows you to optimize the user experience.
For effective device testing, invest in the actual devices you're targeting. This approach requires reliable device management to avoid issues like missing devices or lack of visibility into device usage. An XR MDM solution like ArborXR can address these challenges.
With ArborXR, you can:
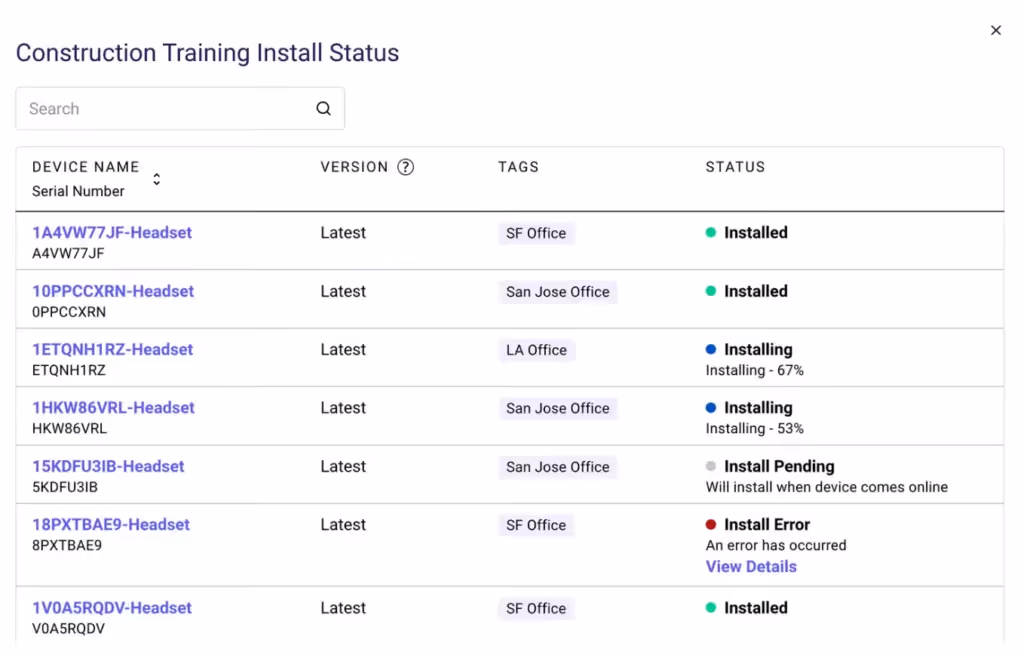
- Deploy and monitor your headsets: Keep track of locations, status, usage, and more.
- Content management: Distribute AR apps at scale and build a content library to manage everything you create and deploy when needed.
- Release channels: Manage different versions of your content (e.g., beta tests), and deploy any version to specific headsets.
- Single and multi-app kiosk mode: Lock users into one or multiple apps to ensure focused testing without distractions.
Once your content passes testing, you may then proceed to distribute it to users.
Note: If you're using AR content for internal initiatives like training and need to manage multiple headsets, ArborXR can streamline your operations. Check out our guide to managing XR training for work for more insights.
Achieve Lasting Impact with Expert AR Development
Creating engaging augmented reality content requires thoughtful planning, smart design, and thorough testing. By following this guide, you can develop AR experiences that captivate users, enhance learning, and add real value to your business.
Remember, effective device management is crucial for AR content deployment. If you're using AR headsets, consider ArborXR as your MDM solution. ArborXR enables you to:
- Deploy headsets at scale
- Install apps and updates remotely
- Deliver smooth single or multi-app kiosk experiences
Ready to elevate your AR content management? Get started with ArborXR today.