
Sure, VR is a fantastic tool for many business use cases — training, meetings, planning, etc. However, like any technological advancement, it comes with its own set of challenges.
One of the significant obstacles to VR adoption is VR motion sickness. To give you an idea of how prevalent this issue is, research shows that 40-70% of VR users experience motion sickness, and about 25% start feeling the effects within just 15 minutes of use. Symptoms can range from mild dizziness to intense nausea, potentially derailing your VR efforts.
The good news is that you can significantly reduce or even eliminate VR motion sickness with proper planning and technology adjustments. In this ArborXR guide, we'll explain the science behind VR motion sickness, its underlying causes, and practical tips to help prevent it.
What is VR Motion Sickness?
VR motion sickness (or VR sickness) is a physical discomfort that occurs when there's a conflict between what your eyes and ears are sensing and what they’re telling your brain during VR experiences.
Here's how it typically manifests:
- Visual input: Your eyes perceive movement within the VR environment.
- Vestibular input: Your inner ear (vestibular system) is responsible for sensing balance and movement. When you see motion, this system expects your body to move in sync with what you see.
When your body remains stationary, but your eyes detect movement, your brain receives conflicting signals from both the visual and vestibular inputs, potentially leading to motion sickness. Some common symptoms of VR motion sickness include nausea, headaches, sweating, dizziness, fatigue, and a general feeling of imbalance.
It's important to note that some factors can exacerbate VR motion sickness or trigger it more quickly. Let's explore those next.
Factors That Influence Motion Sickness in VR
Delayed Reactions
When you move your head or body in VR, there's usually a tiny delay (or latency) before the virtual world updates. Naturally, your brain expects a smooth, instant response, so the delay disrupts your sense of balance and coordination, resulting in disorientation and discomfort.
Overwhelming Visuals
While VR experiences with lots of colors, patterns, and movement are often more immersive, they can also precipitate motion sickness more quickly.
Why? Because the brain has to work harder to process more visuals that might not match up with what your inner ear senses. This extra effort can overwhelm your brain and precipitate motion sickness.
Individual Sensitivity
Some people are more susceptible to motion sickness than others. This sensitivity can stem from various factor, like:
- Genetics
- Inner ear issues (like infections)
- Past experience with motion sickness
For example, someone who easily experiences motion sickness in cars, boats, or planes might be more prone to experiencing it in VR as well.
How To Avoid Motion Sickness from VR
1. Ramp Up User Sessions Slowly
If many of your users are experiencing VR for the first time, we recommend against starting with long sessions immediately. Instead, let them acclimate gradually — begin with short VR sessions and slowly increase the time users spend in the virtual world.
Here's a structured approach to follow:
- Start with Short Sessions: Begin with VR experiences that last just 5 to 10 minutes. This gives users a chance to adapt to the VR world without overwhelming their senses.
- Gradually Increase Duration: Slowly extend each session as users get more comfortable. Increment by 5 minutes at a time to help them build tolerance without pushing too fast.
- Monitor Reactions: Closely observe how users react during and after each session. If they start exhibiting signs of discomfort, cut back on the session length and increase it more gradually.
2. Take Regular Breaks
Continuing in the spirit of taking things slowly, encourage regular breaks within and after sessions.
Plan for short breaks, like a 1-2 minute pause every 10-15 minutes. This gives users' bodies and minds a chance to reset and helps mitigate discomfort. With ArborXR, you can automate these breaks across all your devices, eliminating the need for manual management.
During breaks, encourage users to stand up, stretch, and move around. This helps reduce disorientation from long VR use and promotes overall comfort. After each session, schedule a more extended break of 5-10 minutes.
This extra time helps users recover from any motion sickness and prevents discomfort from building up.
3. Optimize Your VR 3D Environment & Settings
Our User Research has helped us understand nausea from VR is because it’s not an actual environment with a floor users feel they’re standing on, as they would in the real world. While ArborXR Home currently supports 360 images as the background, a 3D environment can eliminate nausea-inducing experience.
A 3D VR Environment is more immersive than a 360 image, and it allows us users to feel “grounded” in VR. Beyond that, it’s a much more premium experience that reflects your company’s brand, since you can customize it according to your brand visuals and guidelines.
Let’s discuss optimizing your VR setup and physical environment so you can help reduce the risk for motion sickness. But what exactly does “optimizing” entail?
Here are three key strategies to reducing nausea in VR:
- Create and manage your VR 3D environment for comfort. Many VR headsets come with 360-degree background images. However, our research shows that users often find them disorienting because they lack a clear floor or reference point.
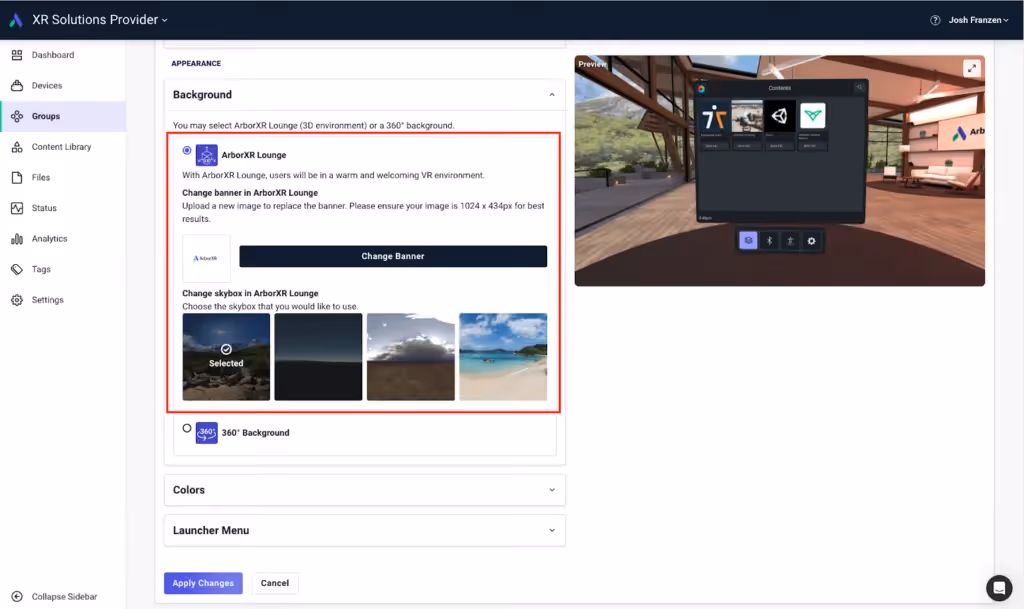
Instead, using a 3D VR environment can provide a more realistic and immersive experience, helping to lessen the feeling of floating and associated nausea. Fortunately, ArborXR allows you to remotely set up a custom 3D environment across all your headsets at once.
- Optimize your physical environment. First, provide chairs for users to sit during VR sessions (whenever possible). Sitting stabilizes their physical orientation and minimizes discomfort. Also, the VR space must be well-ventilated to keep fresh air circulating. Good ventilation helps users stay comfortable and reduces symptoms of motion sickness.
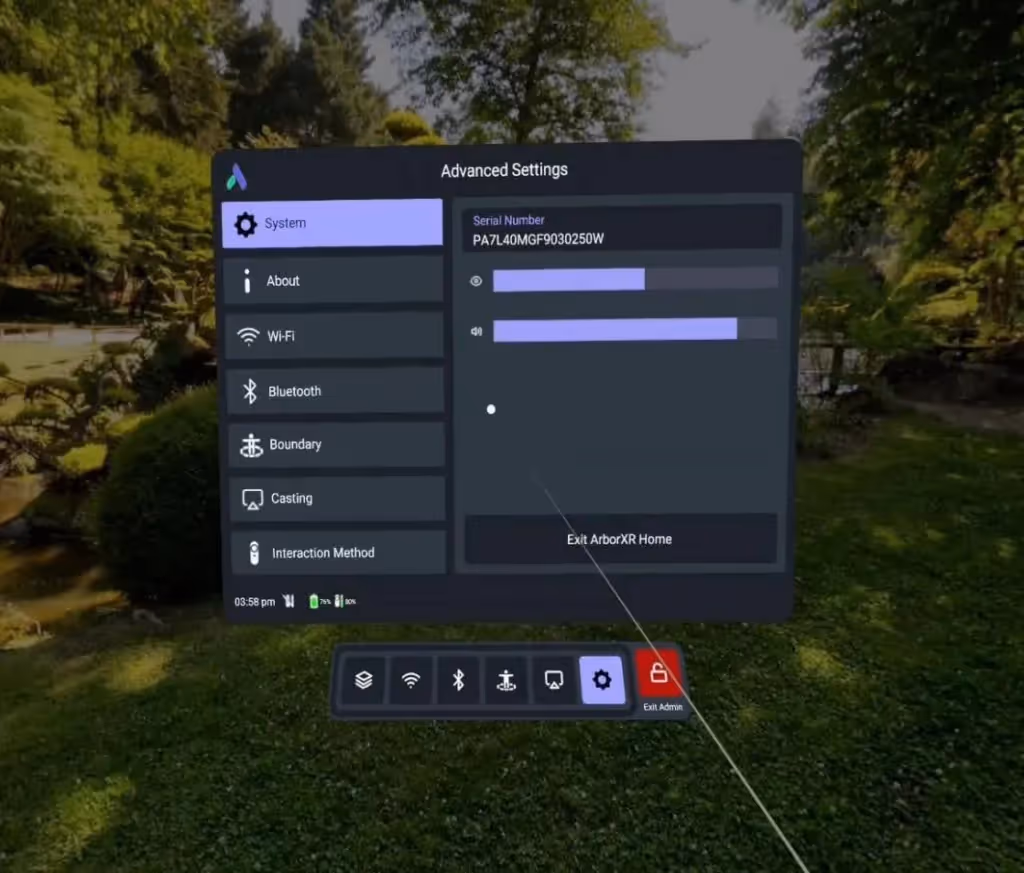
- Adjust VR content brightness. Lowering the brightness of your VR headset can help ease sensory overload and reduce motion sickness. Fortunately, with ArborXR's advanced settings, you can adjust brightness settings for all your headsets from one easy-to-use dashboard, so you don’t have to tweak each one individually.
4. Choose Headsets Carefully
The right headset can be the difference between consistent bouts of cybersickness and completely relaxing experiences. Here are some important things to look out for when choosing a headset:
- High Refresh Rates (at least 90Hz): Higher refresh rates reduce motion blur and lag, resulting in smoother visuals and a decreased likelihood of feeling disoriented.
- 6DoF Instead of 3DoF: Six degrees of freedom (6DoF) enables more natural movement and tracks your movements more accurately, helping to avoid that stuck-in-place feeling and minimizing motion sickness.
- Low Persistence Displays: These displays mitigate motion blur by reducing how long each frame is shown, decreasing visual lag and creating a more comfortable experience.
- Low Latency Tracking: Low latency ensures the VR environment reacts instantly to your movements, avoiding the delays that can lead to motion sickness.
- High-Resolution Displays: Higher resolution reduces the screen door effect and blurriness, making the virtual world clearer and easier on the eyes.
Conduct VR Sessions Without Worrying About Motion Sickness
In this article, we've covered essential information to address VR motion sickness challenges. While optimizing brightness and managing your VR environment is crucial, ArborXR offers a comprehensive solution for all your XR device management needs.
ArborXR helps you:
- Effortlessly Manage XR Devices: Set up, configure, and monitor a variety of VR and AR devices at scale. Keep your devices up-to-date and secure with remote updates and monitoring.
- Install Apps & Content Remotely: Say goodbye to manual installations. Push content updates, manage versions, and verify install status across your entire fleet without ever touching a device.
- Control the Headset Experience: Create an intuitive, distraction-free environment for users with ArborXR Home. Choose which apps to display, customize the environment, and lock down devices to prevent unwanted access.
With ArborXR, you can confidently scale your XR deployments, streamline content management, and deliver an optimal user experience—all from a single, user-friendly platform. Ready to transform your XR device management? Experience the full potential of ArborXR with our free trial. Sign up today and discover how we can elevate your VR projects to new heights.