
Looking for a way to put your VR headset into Kiosk Mode?
In this ArborXR article, we’ll discuss how to set your device in Kiosk Mode for popular VR headsets used in education and enterprise, including the HTC VIVE Focus 3, Pico Neo 2, Pico Neo 3, Pico G2 4k, Meta Quest 2, Meta Quest 3, and Meta Quest Pro.
What is Kiosk Mode?
In VR Kiosk Mode end-users will only have access to a single, specified application on the VR device.
Kiosk Mode is ideal & beneficial in many use cases, including training, development, and education. A healthcare company might use a VR headset in Kiosk Mode to offer a specific therapy. For example, Karuna Labs uses Kiosk Mode to offer a specific therapy for patients dealing with chronic pain.
Kiosk Mode could also be used to demo a product. For example, French automotive manufacturer Renault used VR to demonstrate to business class passengers what it’s like to ride in one of their new cars.
A Human Resources department might use VR headsets in Kiosk Mode to train customer support staff on a soft skill, such as conflict resolution. For example, employees at Hilton have used Oculus headsets to learn greater empathy––which key for hospitality training.
Kiosk Mode gives you total control of what the end-user can access in-headset, including settings, applications, and other content (such as a video playlist). Kiosk Mode also provides a more streamlined, intuitive in-headset experience for the end-user.
Most VR & AR headset manufacturers provide a way to put devices in Kiosk Mode. However, it’s not always very simple or intuitive to make this shift. In many cases, shifting into VR Kiosk Mode requires individual, manual, and technical adjustments.
Kiosk Mode vs. Custom Launcher
Do you need to provide users the ability to select between more than one application in a secure launcher environment? Then you need a Custom Launcher!
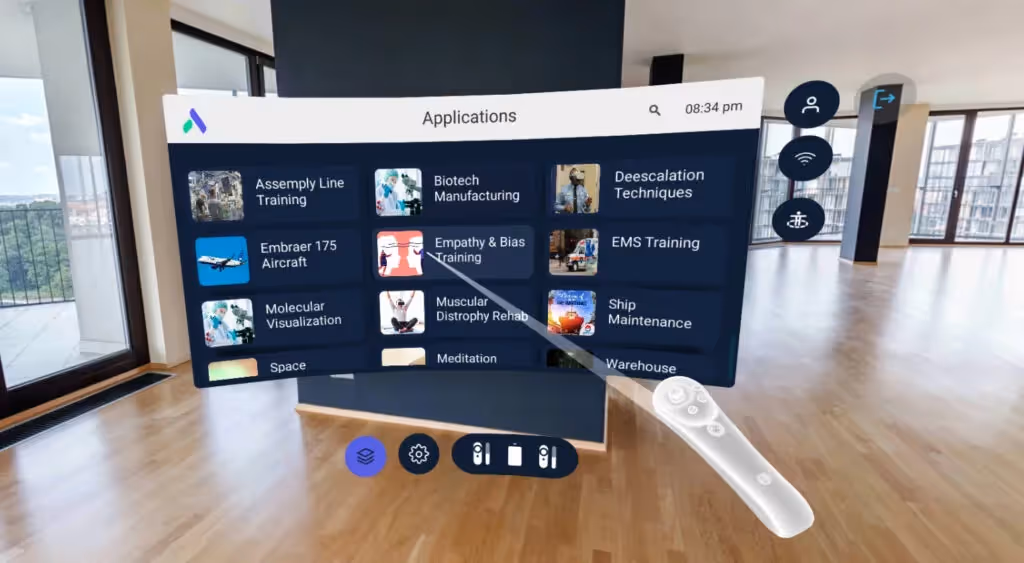
ArborXR comes with a Custom Launcher that displays a grid of selected apps in a simple interface. The end-user can pick and launch only approved apps inside the headset. The Custom Launcher still offers the security and control of Kiosk Mode while giving the end-user the ability to launch into the application of their choice.

The HTC VIVE Focus 3 requires switching to Kiosk Mode in VR (in the headset).
STEP 1: From the main VIVE overlay menu, select “Settings.”
STEP 2: Select “Kiosk Mode.”
STEP 3: Select “Assign Content.”
STEP 4: From the list, select the app you would like to use in Kiosk Mode.
STEP 5: Click “Save.”
STEP 6: Click “Enter Kiosk Mode.”
Note: If there was no content previously selected, you will be prompted to “Select Content” upon saving.
While the setup itself is simple, HTC VIVE Focus 3 does not offer an efficient way to set up devices on a large scale. Every single end-user has to put on their headset and navigate menus to switch it into Kiosk Mode. That makes it less than ideal for companies who may be deploying hundreds, if not thousands, of VR devices.
ArborXR’s native Kiosk Mode is compatible with HTC VIVE Focus devices and allows admin users to enable VR Kiosk Mode on a fleet of devices. There’s no need to individually set up devices. Instead, admin users can remotely configure the specific app and settings they want end-users to have access to.

The Pico Neo 2 allows you to go into Kiosk Mode within business settings.
Before you start, the Pico Neo 2 must be in “Developer Mode” in order to enable Kiosk Mode. Learn how to put the Pico Neo 2 in Developer Mode here.
STEP 1: Navigate to Pico’s settings then select “Developer”
STEP 2: Scroll down then select “System.”
STEP 3: Select “User Configuration.”
STEP 4: Scroll down then select “Business Settings.”
STEP 5: Tab over to “Home Screen Settings.”
STEP 6: Choose the specific application you’d like to use for Kiosk Mode.
The device is now in kiosk mode!
The process is simple enough, but does require an individual user with administrative permissions to manually change this setting on each headset.
ArborXR’s native Kiosk Mode is compatible with Pico Neo devices and allows admin users to enable VR Kiosk Mode on a fleet of devices. There’s no need to individually set up devices. Instead, admin users can remotely configure the specific apps and settings they want end-users to have access to.

Before you start, the Pico Neo 3 must be in “Developer Mode” in order to enable Kiosk Mode. Learn how to put the Pico Neo 3 in Developer Mode here.
STEP 1: Navigate to Pico’s settings then select “Developer.”
STEP 2: Select “Industry settings.”
STEP 3: Click the tab “Launcher App (Kiosk Mode).”
STEP 4: From the list, select the app you would like to use in Kiosk Mode.
STEP 5: Click “Ok” on the prompt “Are you sure you will modify the application to Launder App.”
STEP 6: Click “Restart” on the prompt “You have successfully modified and need to restart the device to take effect.”
The device is now in Kiosk Mode!
This requires manual configuration on each individual device. Again, this option isn’t time- or cost-effective for using AR and VR at scale.
ArborXR’s Kiosk Mode is compatible with Pico Neo devices and allows admin users to enter the web portal and remotely configure devices to Kiosk Mode. This saves a significant amount of time, money, and labor.

The Pico G2 4K offers two ways distinct Kiosk modes:
- Full Kiosk Mode: Restricts users to a specific app.
- Video Kiosk Mode: Locks users to a particular video.
For the Pico Neo 2 and Pico Neo 3, Kiosk mode is built-in and can be activated for any installed app. However, the Pico G2 4K does not have a native Kiosk Mode. Luckily, there are workarounds.
Before you start, the Pico G2 4K must be in “Developer Mode” to enable Kiosk Mode. Learn how to put the Pico G2 4K in Developer Mode here.
Using Full Kiosk Mode on Pico G2 4K
STEP 1: Build an app that lets you use Kiosk Mode. You’ll need to create an app (APK) with specific details:
- Package Name: com.picovrtob.vrlauncher
- Version Code: 3000
- Permissions: The app needs to declare itself as the home screen and default app. So, the code within the APK should include these lines in the Android Manifest file:
<category android:name=”android.intent.category.HOME” />
<category android:name=”android.intent.category.DEFAULT” />
Step 2: Once you have the app built, contact Pico to get access to their app signing website. They’ll provide a username and password. Upload your app there, and you’ll receive a signed version within 10 minutes.
STEP 3: You can then sideload the signed APK onto your device. Once this is installed, you’ll be able to use Full Kiosk Mode.
STEP 4: If you need to deactivate the mode, all you have to do is uninstall the APK.
Using Video Kiosk Mode on Pico G2 4K
STEP 1: Prepare your equipment. You’ll need a USB-C cable, a Windows PC or Mac, and an MP4 360 video.
STEP 2: Enable developer mode. Go to Pico settings and activate developer mode. If you’re currently using Full Kiosk Mode, disable it first.
STEP 3: Rename your video. Format the name as “two-digit number_video name_type” (e.g., 05_ArborVideo_360).
STEP 4: Create a folder. This could be one of these two:
- “video_replay” is used to restart the video when the headset is on.
- “video_continue” is used to resume the video from where it left off.
STEP 5: Transfer the video:
- Copy the renamed video to the folder.
- Connect your headset to your computer using a USB-C cable.
- Copy the folder to the PICO headset’s main directory.
STEP 6: Sideload the following APK files—Auto play service, Video player, and VR launcher onto the headset.
STEP 7: Reboot the headset. After rebooting, the video you’ve locked in the headset will play automatically.
To disable Video Kiosk Mode, switch back to the PVR launcher and reboot your device
If you don’t want to go through the pain of manually setting your Pico G2 4K devices to Kiosk Mode, you can always use ArborXR to do this at scale.

Meta Quest devices (including Quest 2, Quest 3, and Quest Pro) can now all be enrolled in Quest for Business—regardless of whether they were purchased as consumer or business devices. Any Quest device can be enrolled in the Quest for Business program, and Kiosk Mode can be configured remotely via the Quest for Business admin panel.
STEP 1: Go into “Device Manager” on Oculus for Business.
STEP 2: Select the device or devices you want to put into Kiosk Mode.
STEP 3: Select “Settings.”
STEP 4: Click the pencil icon next to “Kiosk Mode.”
STEP 5: Click “On.”
STEP 6: Select the application you want to enable.
STEP 7: Click “Save.”
STEP 8: Your devices are now set to Kiosk Mode.
Quest for Business has expanded its capabilities, offering more flexibility and control for users. Key features now include remote Kiosk Mode settings, installing custom apps, disabling social features, and more.
These updates give administrators more features—but unless you pay significantly more, are still missing key functionalities that third-party solutions like ArborXR can provide. For example, with ArborXR, enterprise administrators can:
- Create locked training environments that display multiple apps
- Customise the home environment with 360 videos and images
- Add custom branding and logos
In addition to what happens in the headset, a device management like ArborXR is a fully featured MDM that gives you more control and flexibility, including the ability to manage different types of devices from multiple OEMs.
In comparison, Quest for Business is an MDM-lite that gives you just the basics.

Scalability
Setting up kiosk mode natively on VR headsets can be time-consuming and inefficient. It’s manageable if you only have one device to manage. But the second you start adding additional devices to the mix, manually setting each one to kiosk mode becomes a nightmare.
For many headsets, you need to enable developer mode. Some, like the Pico G2 4K, even require you to sideload APK files and navigate complex installation processes to access this important, fundamental mode.
And when you scale issues like this up to larger, 10-100+ device deployments? You’re looking at a significant time sink.
Customizability
A key limitation is that native kiosk modes often lack user access customization options. This is fine if you only need to lock users into a single app, but the moment you need more nuanced control, things get complicated.
For instance, users might need to restart the system to fix a glitch or adjust WiFi settings for network issues. These are basic, often necessary tasks. Yet, with native kiosk modes, you can’t selectively allow access to these functions.
This is a problem if your use case requires any degree of customization.
ArborXR is an XR device management (MDM) platform that allows you to deploy your VR headset fleet, manage your entire headset experience, and install apps without stress. As part of this suite, we offer an enhanced kiosk mode that corrects the limitations of native kiosk modes.
With ArborXR, you can put as many devices as you want into kiosk mode all at once—no more cables and manual setup. It’s super simple, no matter how big your VR fleet is. You’ll have everything up and running in just a few minutes.
Key Features of ArborXR’s Kiosk Mode
- Remote Mass Configuration: Set up Kiosk Mode on multiple devices all at once via Wi-Fi, no matter how many headsets you have—no limits!
- Single App Focus: Keeps users locked into just one app, so they stay on track and can’t accidentally wander off to other content.
- Essential System Access: Lets users easily control important system functions like Wi-Fi, casting, and Bluetooth from a handy quick access menu.
- App Restart Option: If the app needs a refresh, users can quickly restart it straight from the quick access menu.
We also offer tons of additional features that make it easier for businesses and organizations to make the most of their XR initiatives, including:
- Unlimited Device Management: Control and oversee your entire XR fleet from a centralized platform.
- Location Tracking: Keep tabs on where your devices are for better asset management and security.
- Easy App Installation and Updates: Roll out and update apps across all devices with minimal effort.
Connect with Top XR Developers
Connect with top XR developers in your industry to get top-notch content for your VR initiatives.
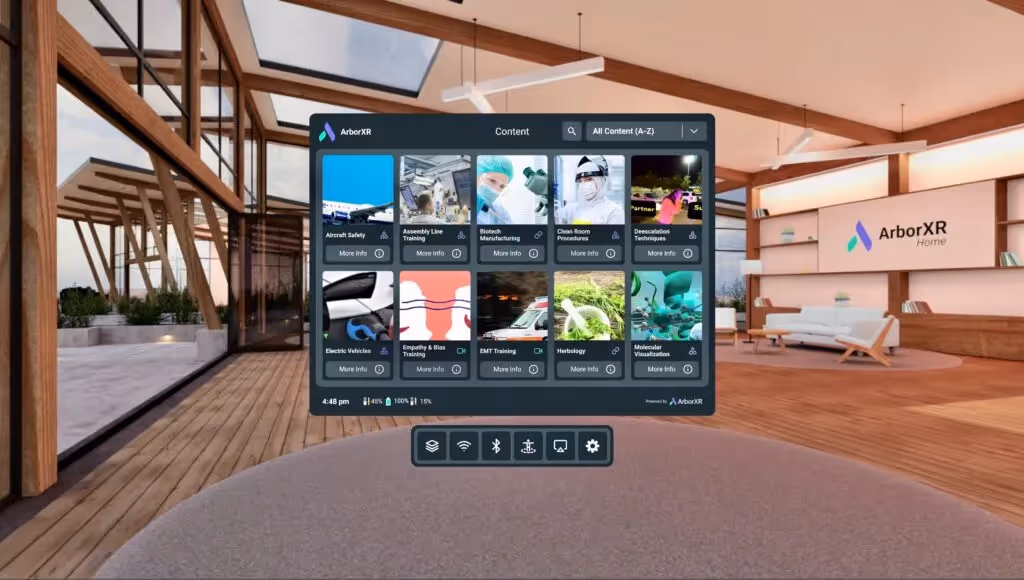
ArborXR Home is ArborXR’s custom VR launcher. It’s a powerful, flexible alternative to Kiosk Mode for administrators looking to create tailored, multi-app VR experiences while maintaining control over device usage.
Key Features of ArborXR Home
- Multi-App Access: Curate a specific set of apps for end-users for a versatile VR environment.
- Branded Experience:
- Custom logo and banner image
- Personalized 3D environments or 360° backgrounds
- Environment Options:
- Default ArborXR Lounge –Custom 360° images
- Custom 3D environments (.gltf or .glb files)
- Device Control: Lock down access to the device’s native home environment.
- Easy Management: Configure all options through the ArborXR dashboard for efficient, fleet-wide updates.
Pricing
Our most budget-friendly plan starts at just $7 per device per month. But keep in mind that ArborXR’s Kiosk Mode is just one piece of our all-in-one XR Mobile Device Management (MDM) solution.
How to Set Up Kiosk Mode With ArborXR
1. Enroll the Device
First, enroll your devices on ArborXR. For non-Quest devices like HTC, Pico, and Lenovo, it’s a straightforward plug-and-play process.
Meta Quest devices require a few extra steps. Setting them up with third-party MDM involves creating separate Meta accounts for each device to enable developer mode. Some resellers offer to handle this provisioning for a small fee. If you’re interested in learning more about this option, reach out to our sales team.
2. Put the Device in Kiosk Mode
Click “Devices & Groups” in your dashboard. From there, you can choose to set up kiosk mode on one device or a group of devices—it’s your call.
After that, select the device or group you want to set up and click on “Headset Experience.” You’ll see options like ArborXR home, kiosk mode, and device home environment. Click on “Kiosk Mode.”
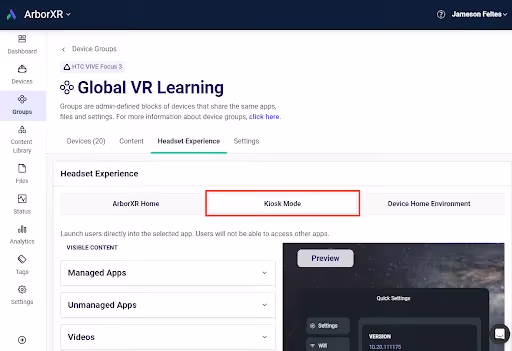
Next, select the app you want to run exclusively in kiosk mode, whether it’s a managed or unmanaged app.
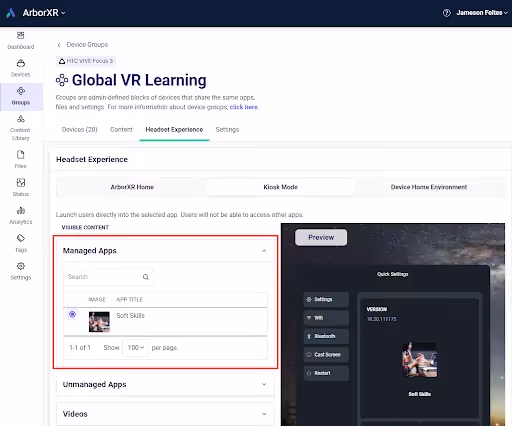
And just like that, your device will be in kiosk mode with your chosen app running.
3. Manage the Experience
Even in kiosk mode, you might want users to access basic settings like Bluetooth, casting, and WiFi.
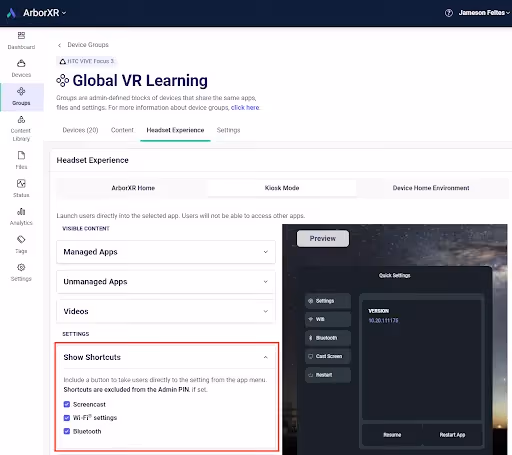
When setting up kiosk mode, look for the “show shortcut” option to select which settings users can access. Headset users can then reach these settings by pressing the home button on the right controller or the headset itself.
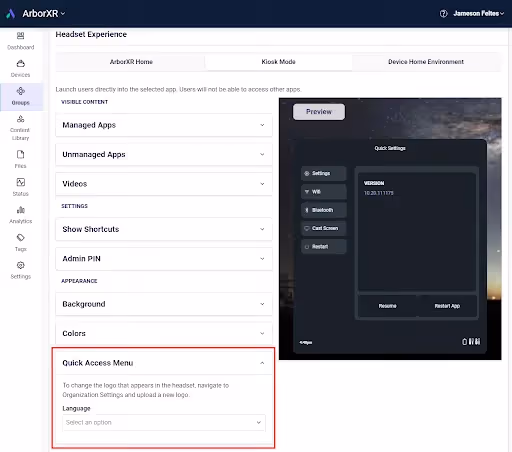
The quick-access menu offers additional options. You can set the language, choosing from up to 10 options (including English, Portuguese, Korean, and Japanese). Plus, you can customize the environment’s theme, so when users pause the app, they stay immersed in an on-brand setting.
Take Control of Your VR Fleet With AborXR
With ArborXR, Kiosk Mode is just the beginning. We give enterprises all kinds of tools and options to manage and control their VR fleet. From fully branded home environments to time-saving mass updates and content installations, we have you covered.
Ready to take your VR deployment to the next level? Get started with a demo today.
Interested in getting started?
Start using ArborXR free today. If you have any questions, visit our product page or email us at hello@arborxr.com.