

With more and more developers using new Macbooks with Apple’s arm64 Silicon chip, building multi-arch container images has become more and more prevalent in the past couple of years. One of the challenges we’ve recently tackled at our company is building unprivileged multi-arch container images.
As it turns out, there don’t seem to be many people doing this. Most of the guides I found online were using docker buildx or buildah, which require privileged containers. These solutions use Docker-in-Docker (dind) to spawn a new container in which the image will be built. They can therefore emulate the architecture of the spawned container through the --platform flag, which uses QEMU under the hood. However, this was a no-go for us since we needed to avoid using privileged containers for security compliance reasons.
Most people building container images are probably familiar with Kaniko, which allows you to build images in an unprivileged manner. Kaniko, as described on the Kaniko Github page:
[…] we extract the filesystem of the base image (the FROM image in the Dockerfile). We then execute the commands in the Dockerfile, snapshotting the filesystem in userspace after each one. After each command, we append a layer of changed files to the base image (if there are any) and update image metadata.
Contrary to docker buildx or buildah, Kaniko builds everything in its own container. This means that Kaniko inherently cannot virtualize and always builds a container image for the architecture it’s running on.
Can’t I just use a multi-arch image from Dockerhub as a base image?
Let’s take php:8.2-fpm-alpine (super specific I know, it’s just the first tag I landed on in my repo, don’t judge me) as an example. You might be thinking to yourself, wait a minute, this image is already a multi-arch image as can be seen in Dockerhub. As soon as we build a new image using FROM php:8.2-fpm-alpine however, it then goes from a multi-arch image, to a single arch image, based on the architecture the new image was built on. We can demonstrate this easily enough by running the following command:
The result of the inspect command:
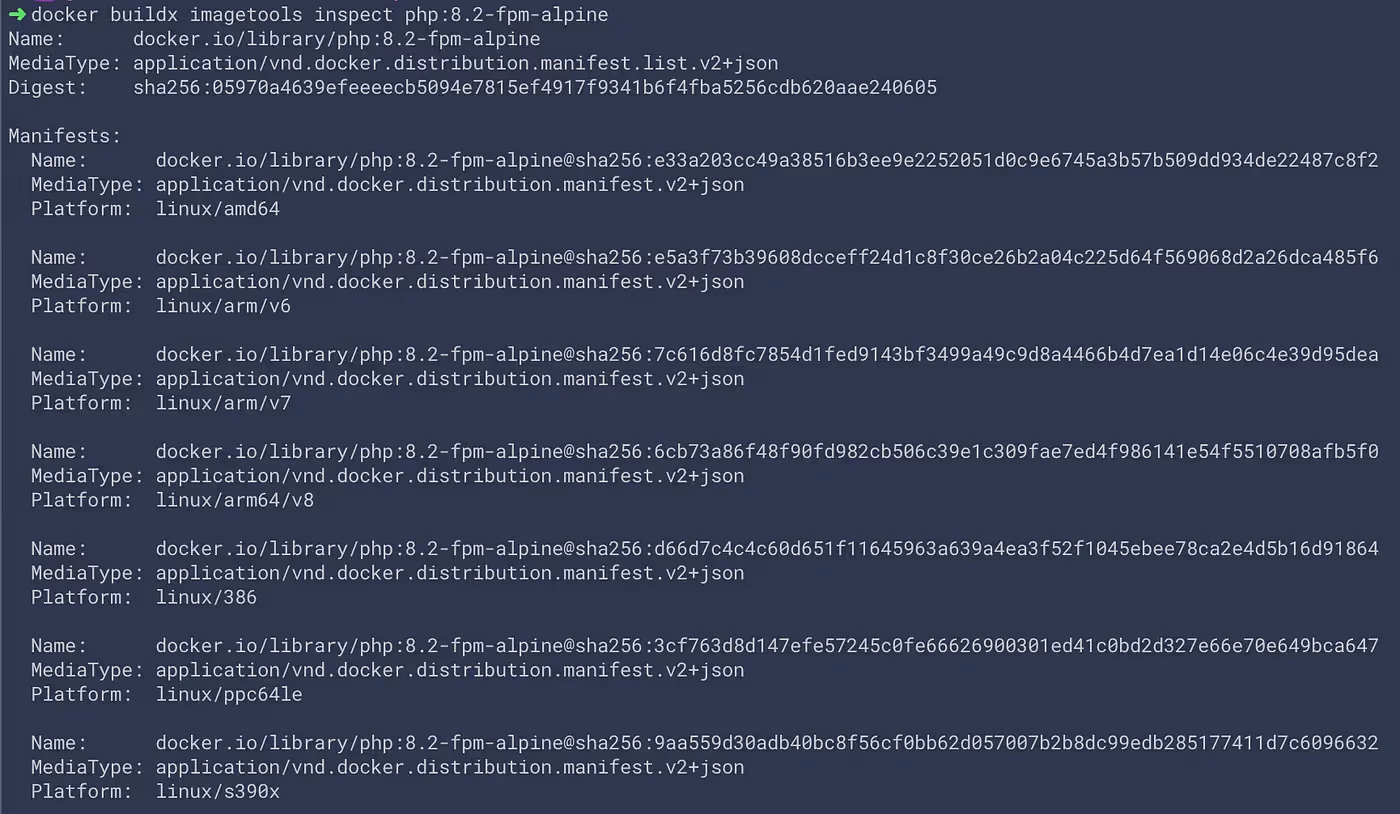
If we then create a Dockerfile that uses FROM php:8.2-fpm-alpine and simply build a new image and push it to our registry, we can see that it becomes single arch:

So what does this mean?
Luckily, container images stored on a registry are referenced using json manifests! A manifest.json file has information about an image, such as layers, size, and digest. For multi-arch images, the manifest.json will contain a list of information for each platform, as can be seen above. This means that if we want to build a multi-arch image, we can build an image for each desired arch individually, and then combine all of the manifests into one glorious multi-arch manifest, which is essentially a multi-arch image.
To do this, we’ll use a tool called manifest-tool. It exposes an easy to use CLI that can be used to combine any number of manifests from different architectures.
That sounds awesome! What’s the plan?
- Deploy an
arm64node pool in our cloud provider of choice (T2A VMs in GCP, Graviton2 VMs in AWS, Dpsv5 VMs in Azure) - Deploy a single multi-arch Gitlab Runner (that’s right, a single one)
- Create pipelines to build
amd64andarm64images simultaneously, then combine them into a multi-arch image usingmanifest-tool
Let’s dive in!
First thing’s first — let’s add an arm64 Node Pool
Our cloud provider of choice is GCP, so these examples will be GCP specific. We’re also using Pulumi instead of Terraform, but the idea will be the same no matter what Infrastructure as Code (IaC) tool you’re using.
In GCP, the arm64 VMs are called Tau T2A (availability constraints to be considered). We’re going to simply add a node pool of t2a-standard-8 to the cluster our Gitlab Runner is running on. Adding arm64 nodes to GKE will automatically add a taint for kubernetes.io/arch=arm64 , meaning that our amd64 workloads will never be scheduled onto them and we don’t need to add a taint ourselves.
1new gcp.container.NodePool('job-arm64-node-pool', {
2  location: gcpRegion,
3  cluster: cluster.name,
4  initialNodeCount: 1,
5  autoscaling: {
6    locationPolicy: 'BALANCED',
7    maxNodeCount: 20,
8    minNodeCount: 1,
9  },
10  management: {
11    autoRepair: true,
12    autoUpgrade: true,
13  },
14  nodeConfig: {
15    machineType: 't2a-standard-8',
16    imageType: 'cos_containerd',
17    metadata: {
18      'disable-legacy-endpoints': 'true',
19    },
20    labels: {
21      'managed-by': 'pulumi',
22    },
23  },
24}, {
25  dependsOn: [cluster],
26});
Wow that was easy! Let’s move onto the next step.
One Gitlab Runner to run them all?
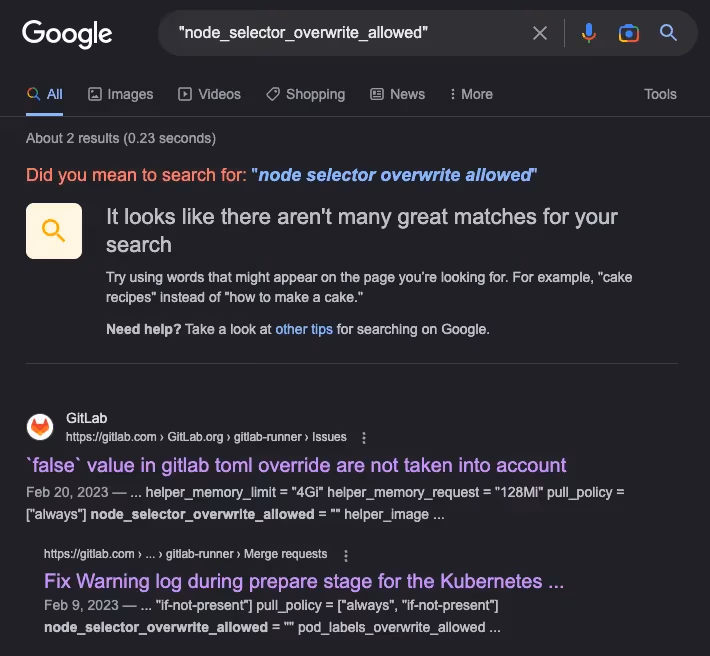
My first thought was that we needed two Gitlab Runners: one tagged for amd64 and one tagged for arm64. As it turns out, Gitlab very recently merged an amazing feature that is still undocumented. The feature allows you to set a config option in your config.toml that allows any Gitlab CI job to overwrite node selectors for your runner. We can set this up for our runner as follows:
[[runners]]
  [runners.kubernetes]
    node_selector_overwrite_allowed = ".*"
You know you’re using new features when your Google results look like this.
Once node_selector_overwrite_allowed is set, you’ll be able to use environment variables to modify your runner’s node selector in specific jobs of your Gitlab CI pipelines as such:
variables:
  KUBERNETES_NODE_SELECTOR_ARCH: 'kubernetes.io/arch=arm64'
At the time of writing this, there are almost no Google results when searching for this environment variable, but I swear it works! The next thing we need to do is make sure that our actual gitlab-runner is using multi-arch images, so that it can properly run on both amd64 and arm64 nodes. Let’s head over to Dockerhub and have a look.
First up, the gitlab-runner image:
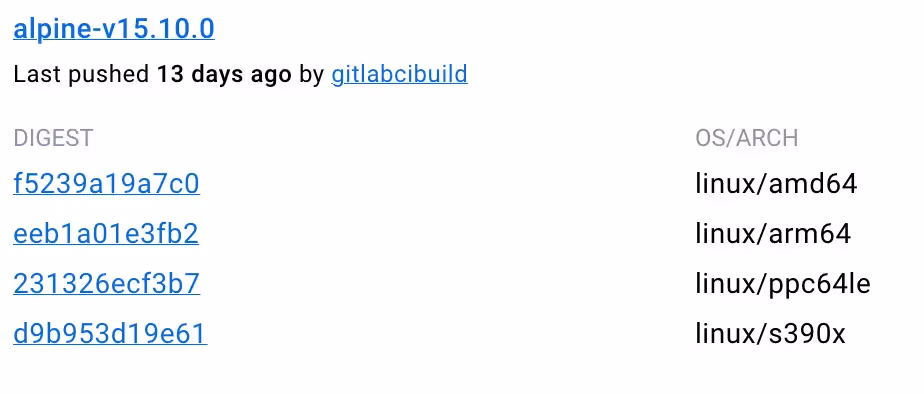
All good on that front. Next up, the gitlab-runner-helper image:
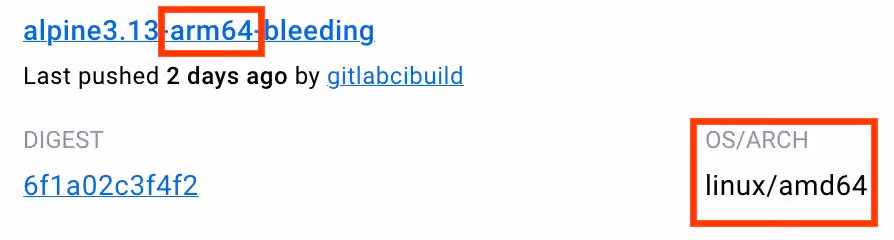
Umm… What is going on? Not only is the gitlab-runner-helper:alpine3.13-arm64-bleeding image not multi-arch, it’s tagged as having a linux/amd64 OS/ARCH. If you look through all of their tags containing arm64, you’ll quickly notice that they’re all incorrectly tagged, as one user pointed out in an open gitlab issue. Never fear though, the OS/ARCH is actually wrong on Dockerhub and the image will, in fact, run on the architecture specified in the image name.
However, we still have one issue: they’re single arch. Which means we would need one for amd64 nodes and one for arm64 nodes. That’s no good.
Digging around a little bit, I ended up finding Bitnami’s gitlab-runner-helper images, which are multi-arch! Great! No need to build our own multi-arch images. Unfortunately, when I tried using the bitnami/gitlab-runner-helper my pipelines began failing instantly. I ended up finding a bug report in Bitnami’s issues on Github, where a user was reporting the same problem I was experiencing.
Back to square one
We need to build a multi-arch gitlab-runner-helper image. Let’s do it locally in Docker for now, and we can transform this into a pipeline job later on.
docker pull gitlab-runner-helper:alpine3.13-arm64-bleeding
docker tag gitlab-runner-helper:alpine3.13-arm64-bleeding registry/gitlab-runner-helper-arm64:alpine3.13-bleeding
docker push registry/gitlab-runner-helper-arm64:alpine3.13-bleeding
docker pull gitlab-runner-helper:alpine3.13-x86_64-bleeding
docker tag gitlab-runner-helper:alpine3.13-x86_64-bleeding registry/gitlab-runner-helper-amd64:alpine3.13-bleeding
docker push registry/gitlab-runner-helper-amd64:alpine3.13-bleeding
Notice that we’re adding the ARCH to the actual image name and not the tag. This is because of the way that manifest-tool does its templating.
Now that both of our helper images are pushed to our registry, we can combine them into one multi-arch image. One important thing to note: manifest-tool has a docker image (mplatform/manifest-tool), however, this image does not have a shell, which means it cannot be used in Gitlab CI jobs.
For that reason, we’ll use a curl image and simply download the manifest-tool binaries. If you want to use mplatform/manifest-tool locally to combine your gitlab-runner-helper images, that’s perfectly fine.
First, let’s pull our curl image and run it:
docker pull curlimages/curl
docker run --rm -it --entrypoint "" curlimages/curl sh
Then, from inside the curl container, we’re going to download the manifest-tool binaries, and rename the one that matches our current arch, then change its permissions to be executable:
cd /tmp
curl -s -L https://github.com/estesp/manifest-tool/releases/download/v2.0.8/binaries-manifest-tool-2.0.8.tar.gz | tar xvz
mv manifest-tool-linux-arm64 manifest-tool
chmod +x manifest-tool
Finally, let’s run the manifest-tool command:
./manifest-tool --username username --password password push from-args
--platforms linux/amd64,linux/arm64
--template registry/gitlab-runner-helper-ARCH:alpine3.13-bleeding
--target registry/gitlab-runner-helper:alpine3.13-bleeding
Let’s break that down:
--username: image registry username--password: image registry password--template: the template themanifest-toolis evaluating. In our case, the-ARCHcomponent is the keyword that it’s looking for. Essentially, it will take every image that matches the template, while replacingARCHbyamd64andarm64--target: the resulting multi-arch image name and tag
Interesting note here: notice that we never actually pull the images into our curl container. This is because manifest-tool will authenticate against our registry and read the manifest information remotely.
Congrats! We now have a multi-arch gitlab-runner-helper image. Let’s not forget to update the image in our runner’s config.toml, and while we’re at it, let’s make sure that the privileged flag is set to false.
[[runners]]
   [runners.kubernetes]
     node_selector_overwrite_allowed = ".*"
     helper_image = "registry/gitlab-runner-helper:alpine3.13-bleeding"
     privileged = false
The final thing we’re going to want to do is tag this runner with a meaningful name. Since I’m deploying my runners through the gitlab helm chart, we’re going to set the tags value under the runners section in the values.yaml file:
runners:
  tags: multi-arch
Final step: The pipelines
We’re going to be creating a template file, that will get included and extended by each job that needs to build multi-arch container images.
First, let’s have a look at the file. This should seem a little bit familiar, as it’s quite similar to the process we did above for building our multi-arch gitlab-runner-helper image, except for the fact that we’re now using Kaniko to build images instead of simply pulling some from Dockerhub. Don’t worry, we will break this down in detail right after.
default:
  tags:
    - multi-arch
  image:
    name: gcr.io/kaniko-project/executor:v1.9.1-debug
    entrypoint: [""]
  before_script:
    - echo "{\"auths\":{\"${CI_REGISTRY_URL}\":{\"auth\":\"$(printf "%s:%s" "${CI_REGISTRY_USER}" "${CI_REGISTRY_PASSWORD}" | base64 | tr -d '\n')\"}}}" > /kaniko/.docker/config.json

.build-amd64:
  needs: []
  variables:
    KUBERNETES_NODE_SELECTOR_ARCH: "kubernetes.io/arch=amd64"
    ARCH: amd64
  script:
    - /kaniko/executor
      --context "${DOCKERFILE_LOCATION}"
      --dockerfile "${DOCKERFILE_LOCATION}/Dockerfile"
      --build-arg BASE_IMAGE_NAME="${BASE_IMAGE_NAME}"
      --build-arg BASE_IMAGE_TAG="${BASE_IMAGE_TAG}"
      --build-arg OCI_IMAGE_AUTHORS="${OCI_IMAGE_AUTHORS}"
      --build-arg OCI_IMAGE_SOURCE="${OCI_IMAGE_SOURCE}"
      --build-arg OCI_IMAGE_VERSION="${OCI_IMAGE_VERSION}"
      --build-arg OCI_IMAGE_VENDOR="${OCI_IMAGE_VENDOR}"
      --build-arg OCI_IMAGE_DESCRIPTION="${OCI_IMAGE_DESCRIPTION}"
      --build-arg OCI_IMAGE_BASE_NAME="${OCI_IMAGE_BASE_NAME}"
      --destination "${CI_REGISTRY_URL}/${IMAGE_NAME}-${ARCH}:${IMAGE_TAG}"

.build-arm64:
  extends: .build-amd64
  variables:
    KUBERNETES_NODE_SELECTOR_ARCH: "kubernetes.io/arch=arm64"
    ARCH: arm64

.build-multi-arch:
  image:
    name: curlimages/curl:latest
    entrypoint: [""]
  variables:
    KUBERNETES_NODE_SELECTOR_ARCH: "kubernetes.io/arch=amd64"
  before_script:
    - curl -s -L https://github.com/estesp/manifest-tool/releases/download/v2.0.8/binaries-manifest-tool-2.0.8.tar.gz | tar xvz
    - mv manifest-tool-linux-amd64 manifest-tool
    - chmod +x manifest-tool
  script:
    - ./manifest-tool --username "${CI_REGISTRY_USER}" --password "${CI_REGISTRY_PASSWORD}" push from-args
      --platforms linux/amd64,linux/arm64
      --template ${CI_REGISTRY_URL}/${IMAGE_NAME}-ARCH:${IMAGE_TAG}
      --tags ${IMAGE_TAG}
      --target ${CI_REGISTRY_URL}/${IMAGE_NAME}:latest
As promised, let’s break it down:
tags: specifies which runner we want to targetgcr.io/kaniko-project/executor:v1.9.1-debug: Gitlab recommends using thedebugversion of Kaniko for the same reason that we use acurlimage instead ofmplatform/manifest-tool— because it needs a shelldefault: before_script: this allows us to authenticate to our registry by using Gitlab variables that are defined at the project/group level. It’s simply creating a.docker/config.jsonwithin the Kaniko container with the correct auth info.needs: []: you might have noticed that we’re not using any stages. We’re actually running fully stageless Gitlab CI pipelines. This means we rely entirely onneedsrelationships. This one in particular states that it needs no other job to begin execution. In other words, it will start as soon as a pipeline is triggered.KUBERNETES_NODE_SELECTOR_ARCH: the variable that is used bygitlab-runnerto modify our node selector (that undocumented thing, remember?)ARCH: defining a variable that we can use to tag our images with the arch dynamically instead of having to repeat the/kaniko/executorscript in both jobsOCI_*: args that are used by our Dockerfiles to define labels according to OCI specifications. Not particularly relevant to this guide.manifest-tool --tags: attribute that we didn’t cover in our earlier example, used to set extra tags as well as the--target
Now onto the actual implementation. Let’s use the php:8.2-fpm-alpine (yes, this image again, I’m sticking to it) as an example.
include:
  local: ".gitlab/ci_templates/build-multi-arch.gitlab-ci.yml"

.php-setup: &php-setup
  variables:
    DOCKERFILE_LOCATION: docker-files/php
    IMAGE_NAME: php
    IMAGE_TAG: "8.2-fpm-alpine"
    BASE_IMAGE_NAME: php
    BASE_IMAGE_TAG: "8.2-fpm-alpine"
    OCI_IMAGE_AUTHORS: $CI_COMMIT_AUTHOR
    OCI_IMAGE_SOURCE: $CI_REPOSITORY_URL
    OCI_IMAGE_VERSION: $IMAGE_TAG
    OCI_IMAGE_VENDOR: ACME
    OCI_IMAGE_DESCRIPTION: "ACME php image"
  only:
    changes:
      - docker-files/php/**/*
  except:
    refs:
      - pipelines

php [amd64]:
  <<: *php-setup
  extends: .build-amd64

php [arm64]:
  <<: *php-setup
  extends: .build-arm64

php [multi-arch]:
  <<: *php-setup
  needs:
    - job: php [amd64]
    - job: php [arm64]
  extends: .build-multi-arch
Once again, let’s break it down.
include: this allows us to extend the template jobs, while keeping a nice separation of logic and not over-crowding one file. You can also have this in a templates repository andincludea remote file..php-setup: &php-setup: this is a yaml anchor. It allows us to define ourvariables,rules, andexceptionsfor all of our jobs pertaining to this image.<<: *php-setup: this is basically just copy pasting our entire yaml anchor block.
Summary
Once these pipelines are set up, you can try running them in Gitlab to see if everything works out. If everything works properly, you should see your runner spawning pods on two different node architectures simultaneously, building your images and then combining them into one in your registry.
It’s been a pleasure writing this, and if you made it this far, hopefully, everything is working flawlessly for you. Let’s be honest, though, there’s almost always some little thing that doesn’t work perfectly when following these guides.
Do these types of challenges interest you? We’re always looking for developers to join us. Leave any comments (or corrections!) in the comments below.
Victor Agnew
Devops/Platform Engineer @ ArborXR